

How to Make a Colorblock Courthouse Steps Quilt

Recently, I sewed a whole bunch of Courthouse Steps and Log Cabin quilts. The classic layouts combined with some vibrant, fun fabrics made me so happy that I couldn’t stop at just one!
Although I love all of the quilts, this “colorblock” Courthouse Steps quilt version turned out to be my favorite, though I’m not entirely sure why it stands out to me.
Perhaps it’s the color palette, the mix-and-match nature of the blocks, the somewhat-random method I used to pair the blocks, or the simple satisfaction of using up leftover yardage. It might be a combination of all these factors. Whatever the reason, I’m in love!
If you’d like to make your own version of this Colorblock Courthouse Steps quilt, I’ve outlined my approach to cutting and pairing the colors below (there was a method to my randomness!).
Cutting plan Approach: A Quick Overview
Block Layout Approach
Before we draft our cutting plan, let's first discuss the layout of the blocks for this two-color "colorblock" quilt, as this is crucial to the approach.
Each block will use two colors of fabric. And the block is split between these two fabrics into two sections, Component A (red in the illustration below) and Component B (lilac in the illustration):

Each block breaks down into two components: the “A” is red and the “B” is lilac in this example.
To remember which color is which, keep in mind that the Component A’s color starts the block with the center square and finishes the block with the final two “courthouse steps” (aka the horizontal pieces in the illustration above).
Cutting Approach
Now that we have this rule in place, let's talk about how to approach drafting our cutting plan.
There are many ways to create a cutting plan, but for this quilt, we'll determine the number of pieces of each fabric to cut by considering the quilt in terms of blocks of the same color.
What does this mean?
As we already established, each block consists of an "A" color and a "B" color:
Each block is made up of two components: A (in red) and B (in lilac).
But, for cutting purposes, we'll assume that for each individual block, the fabric for Component A is the same as the fabric for Component B:

For cutting purposes, we’re going to assume for each block all the pieces are the same fabric.
Once we know the total number of blocks and the fabrics we're using, we'll assign each "complete" block to a fabric. This will make it easy to determine how many pieces of each fabric to cut and how much fabric you'll need.

This is what an example quilt top will look like….

…but this is how we’re approaching cutting.
After determining how many complete blocks we'll cut from each fabric, we will split the blocks into their two components and pair them to create our colorblock combinations.
Step-by-Step
Now that we’ve gone through an overview of our approach, let's walk through this process step-by-step. To illustrate the process, I'll be using a throw-size quilt using 20 blocks, each 14" x 14" finished, with 2" finished steps as my example here.
Step 1: Determine your block construction
There are many options and variations for the Courthouse Steps block. Do you want a larger center square? Different widths for the steps? Stripes in your steps? Or maybe some half-rectangle triangles? There's no wrong way to make your blocks!
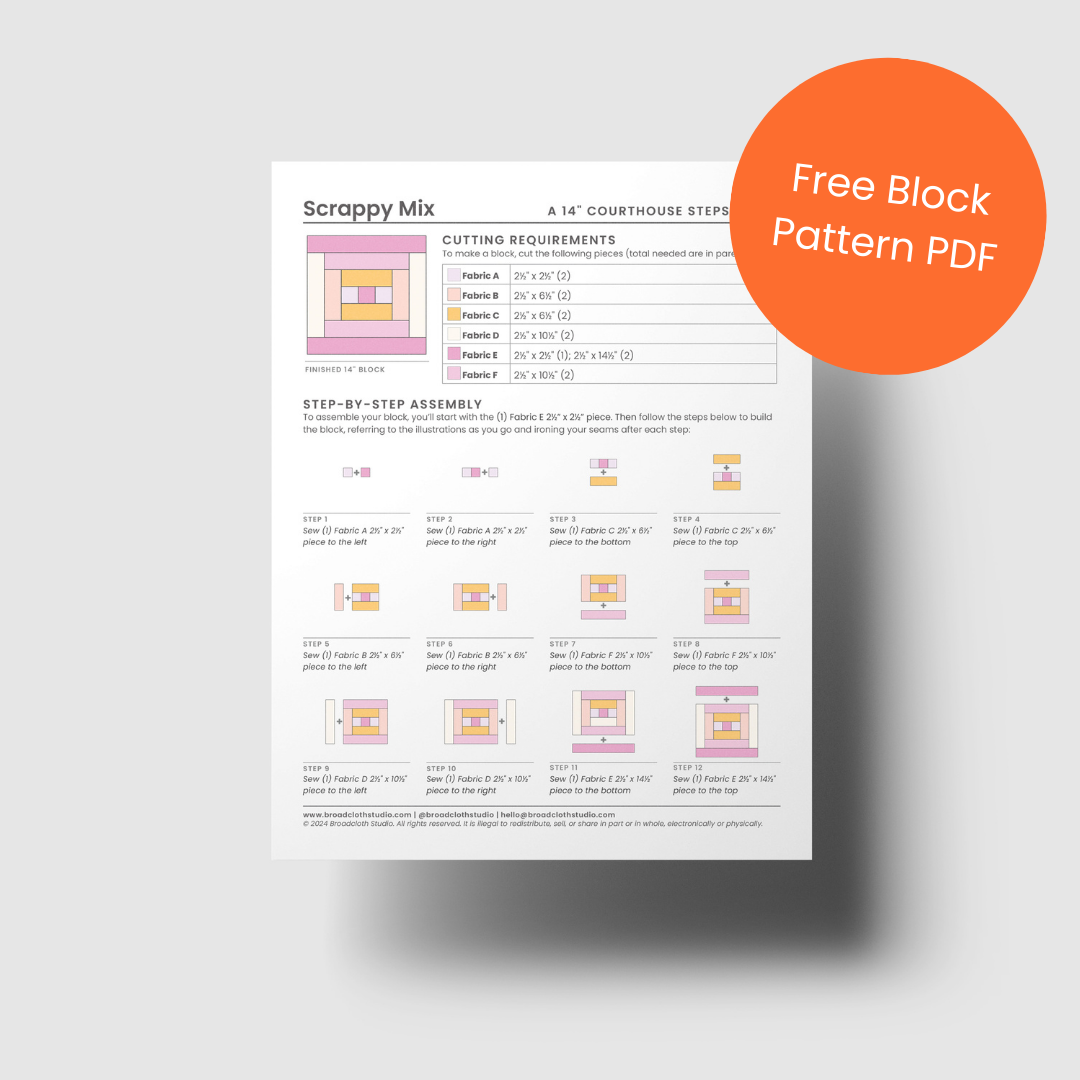
For our example quilt, we'll stick to the basics: all steps will have an equal 2" finished width, and the blocks will finish at 14" x 14":

Our example quilt block will finish at 14" x 14" and will have steps that have a 2" finished width
Assuming a ¼" seam allowance and a 42" width of fabric (WOF), we'll cut the following pieces to make each complete block:
2½" x WOF (3), subcut to:
2½" x WOF (1): 2½" x 14½" (2); 2½" x 6½" (2)
2½" x WOF (1): 2½" x 10½" (4)
2½" x WOF (1): 2½" x 6½" (2); 2½" x 2½" (3)
And our block components will break down as follows:
Component A: 2½" x 14½" (2); 2½" x 10½" (2); 2½" x 6½" (2); 2½" x 2½" (1)
Component B: 2½" x 10½" (2); 2½" x 6½" (2); 2½" x 2½" (2)
Each block breakdowns into Component A (the horizontal pieces) and B (the vertical pieces)
Step 2: Determine number of blocks

An illustration of our “example” quilt layout.
For this example, we're making a throw-size quilt with 20 blocks, arranged in five rows of four blocks each. With each block finishing at 14" x 14", this will get us a nice sized 56" x 70" throw quilt quilt.
Side note: in all these quilt top illustrations, every other block is rotated 90 degrees and every other row switches which rotation it begins with. This isn’t important to the math, but I wanted to flag it in case you want to use the same block layout in your quilt top!
Step 3: Determine number of fabrics
And for this example, we’re going to work with six fabrics.
Step 4: Determine number of blocks per fabric
To figure out the number of complete set of pieces for a block we’ll be cutting from each of our fabrics, we need to do a little math.
No. of Blocks per Fabric = Total No. of Blocks in the Quilt / No. of Fabrics
If this is a whole number, great, you can move on to Step 5!
If the number is a decimal, you'll need to adjust your numbers slightly to figure out how many complete blocks you’ll be cutting from each fabric. Here's an easy method:
Take the number from the calculation and ROUND DOWN to the nearest whole number.
Multiply this whole number by the number of fabrics you're using.
Subtract this number from the Total Number of Blocks to get the number of “extra” blocks.
Distribute this number among your fabrics as equally as possible.
For our example, we start by dividing the Total No of Blocks in the Quilt by the No. of Fabrics: 20 / 6 = 3.333. Then we:
Round 3.333 down to 3
Multiply 3 by 6 (our number of fabrics) = 18
Total No. of Blocks - Step 2 = 20 - 18 = 2
Which means we need to distribute these extra 2 blocks between two different fabrics. Here's one way you could divvy them up:
Fabric A and Fabric B: (4) blocks each
Fabric C, D, E, F: (3) blocks each
Step 5: Determine pairs of blocks
Now we know we’ll be cutting the following from each of my fabrics:
Fabric A and Fabric B: (4) complete blocks
Fabric C, D, E, F: (3) complete blocks
Which means, we’ll have the following components to work with:
Component A:
Fabric A and Fabric B: (4) of each
Fabric C, D, E, F: (3) of each
Component B:
Fabric A and Fabric B: (4) of each
Fabric C, D, E, F: (3) of each
Typically, I’ll pair up my fabrics on my cutting mat without a written out plan. I use 2½" squares to represent the different components, making “pairs” with one square to represent Component A and two squares to represent Component B.
If you prefer to plan out your pairs, follow these steps:
Write out two separate lists: one for each of your Component As and one for each of your Component Bs.
Assign each Component B to a Component A, ensuring not to repeat any pairs for as long as possible. Cross off each Component B as you go.
Here's one possible way to pair up the components using our example (the first letter is Component A, the second is Component B):
A / B
A / C
A / D
A / F
B / A
B / D
B / E
B / F
C / A
C / B
C / D
D / A
D / C
D / E
E / B
E / C
E / F
F / A
F / B
F / E
Step 6: Start making!
You’ve got your pieces cut and your individual block layouts sorted out with the component pairs, so now it’s time to start making your blocks!
Looking to make a different quilt size?
If you’re looking to make a quilt top using 14" finished Courthouse Steps block with 2" finished steps as described above, here’s how many I would suggest sewing to make the following quilt sizes.
And if you’re working with six fabrics, I’ve also compiled a suggested number of “complete” blocks to cut from each fabric as well as suggested pairings! To access that information, just click the link for “Colorblock Pairings” next to the size you want to make:
Crib (42" x 56"): 12 blocks (Crib Size Colorblock Pairings)
Throw (56" x 70"): 20 blocks (Throw Size Colorblock Pairings)
Twin (70" x 98"): 35 blocks (Twin Size Colorblock Pairings)
Full/Queen (98" x 112"): 56 blocks (Queen Size Colorblock Pairings)
King (112" x 112"): 64 blocks (King Size Colorblock Pairings)
One last suggestion!
This quilt is such a joy to make and a great way to experiment with color palettes. Make sure to sure to check out my digital coloring page: Scrappy Mix Courthouse Steps to play around with different options before cutting into your fabric!
And one last Idea: An easy variation idea

Add a “pop” of color with a seventh fabric as the center square in every block!
If you prefer to have each center square in a different color (like the dark red in the example to the right), you'll need to adjust your cutting plan just a little bit!
To create this variation, cut one less 2½" x 2½" piece for each block of fabric, and then cut enough 2½" x 2½" pieces from a seventh fabric to replace the centers in each block of your quilt top.
Looking for Complete Pattern Arrangements?
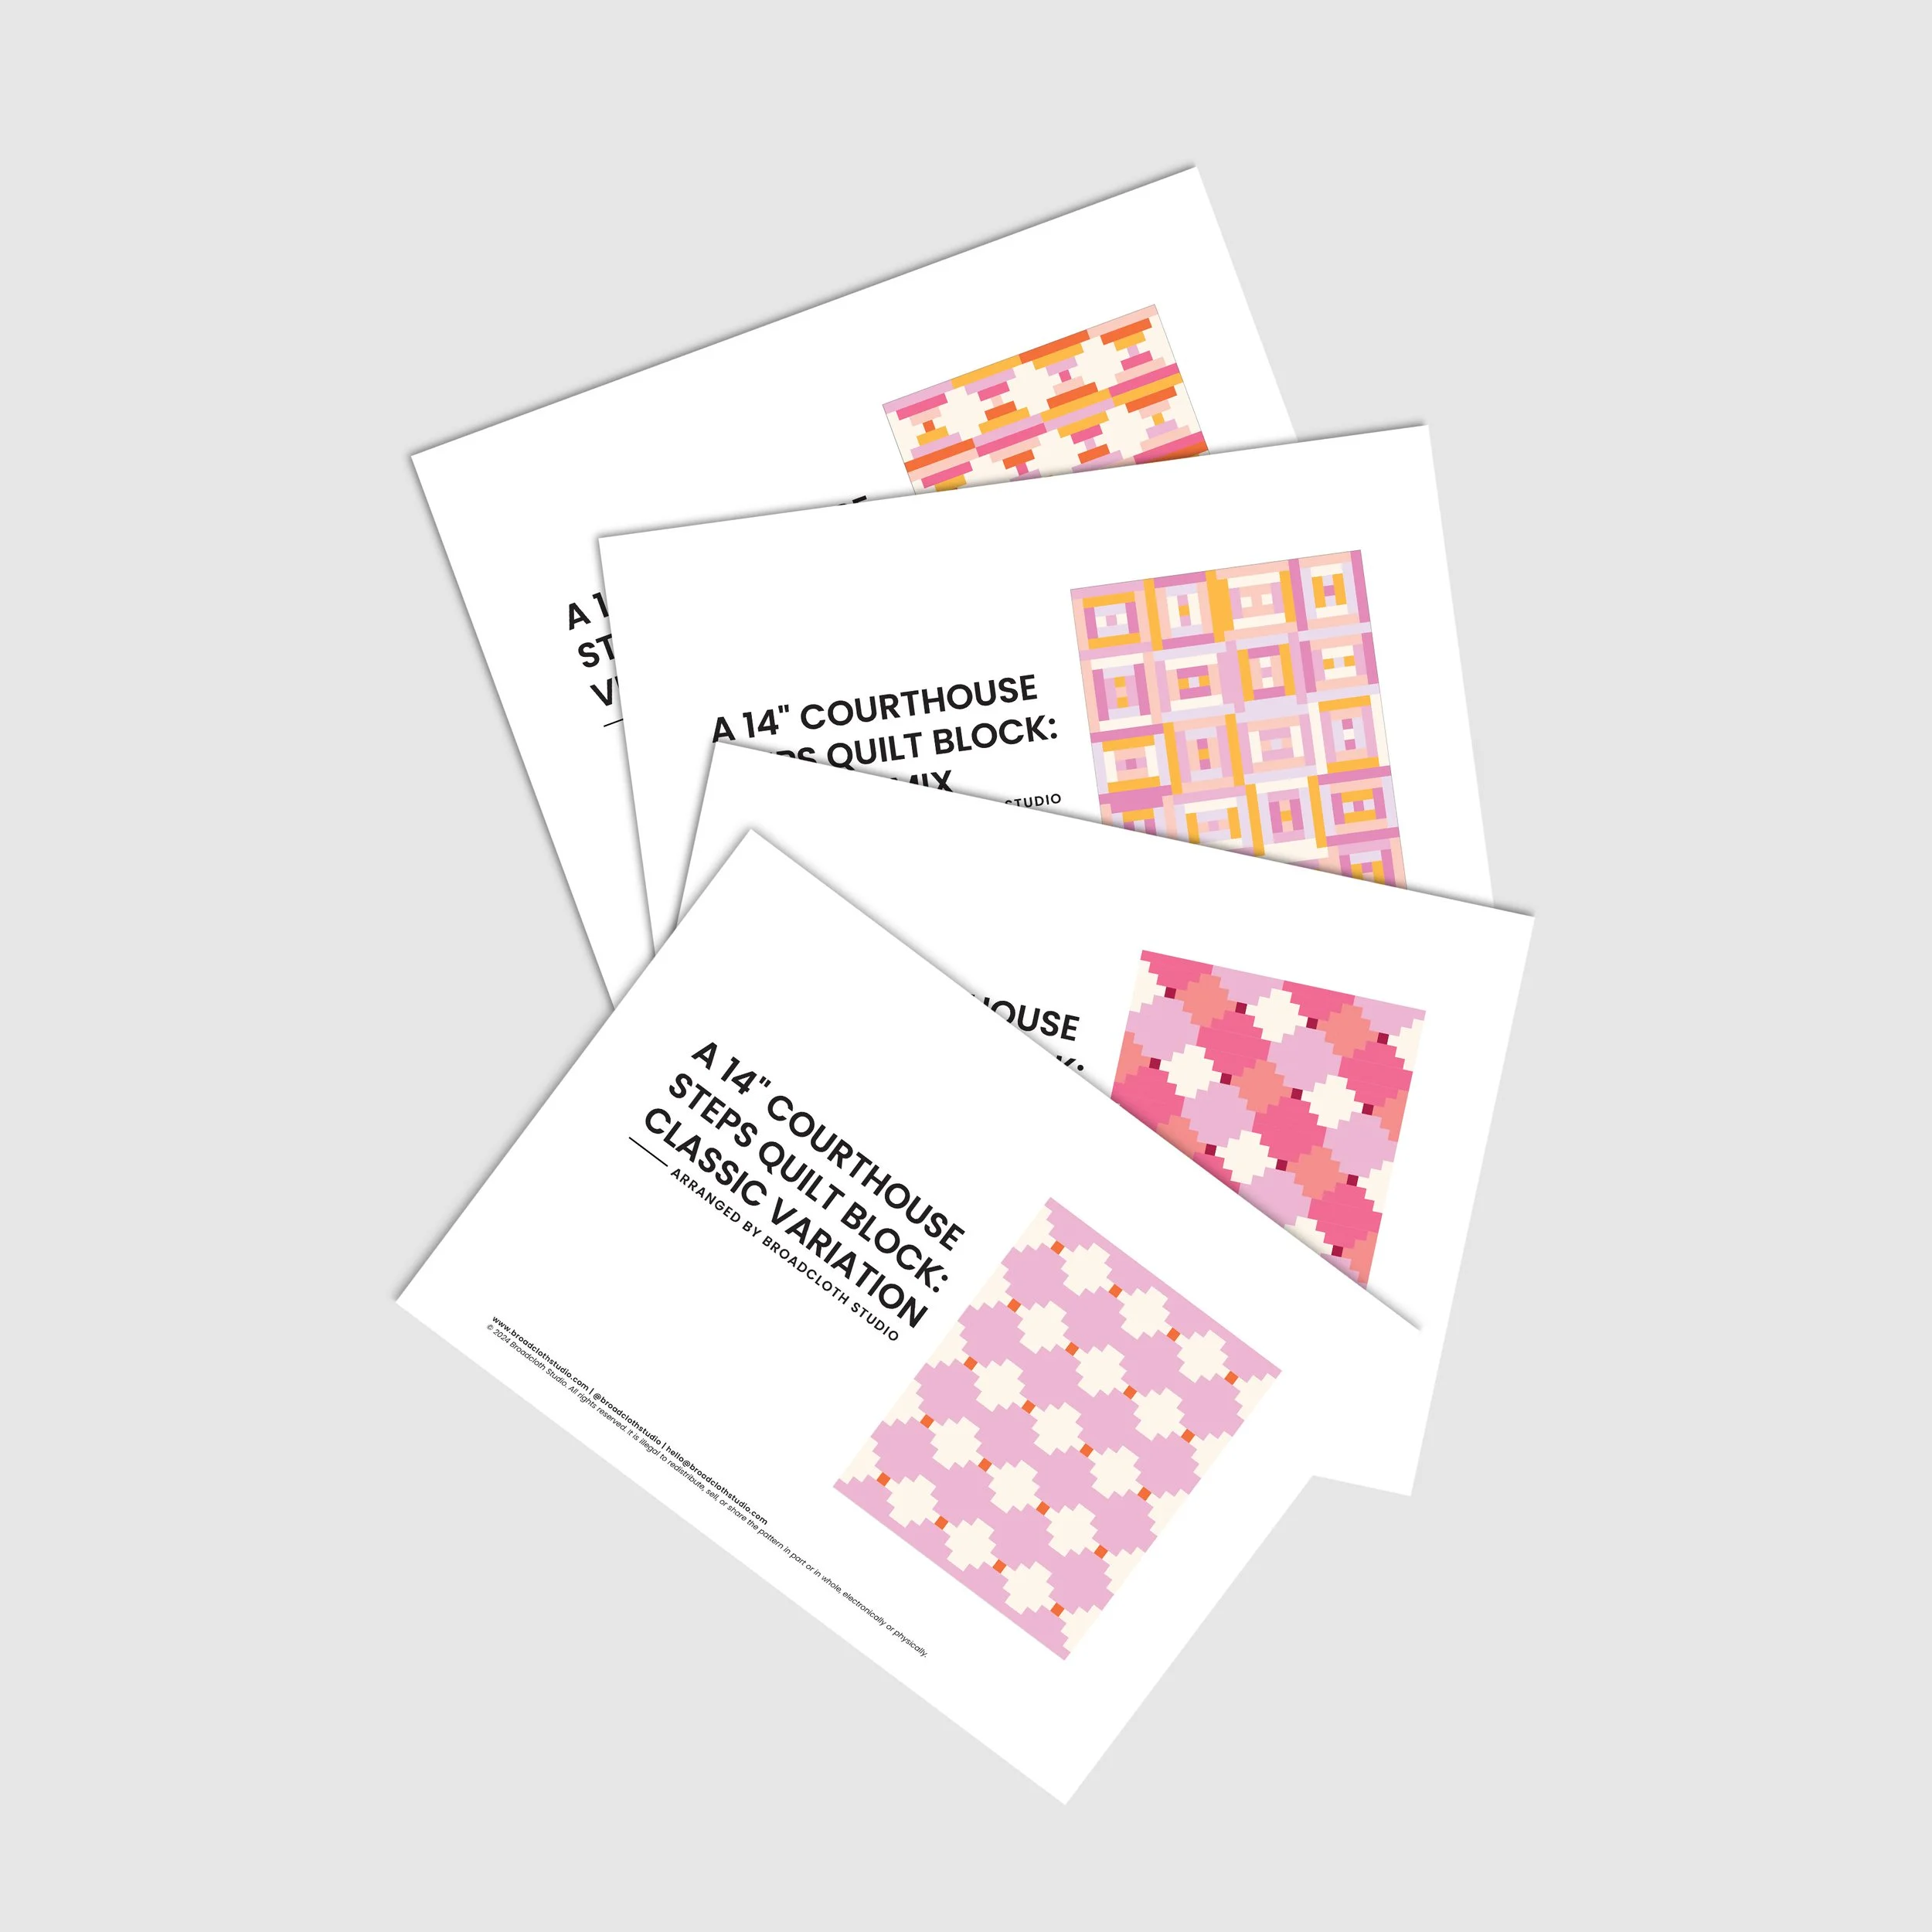
If you're looking for comprehensive step-by-step cutting instructions to make the colorblock quilt described above, check out my Courthouse Steps Bundle in the shop!
This suite of patterns provides all the guidance you need to make the full range of sizes with six fabrics.
All you need to do is pair up your fabrics across the blocks using the process above (make sure to download the suggested pairings chart too!)
You May Also Enjoy These Quilting Tips and Guides:


